Collaborating on a Project
Collaborating allows you to grant other users access to server projects within the shared workspace. It also allows multiple users to contribute to a server project. For a project to be collaborated with other users, it must first be uploaded to the server, see Uploading a Project for more information.
Sending a Collaboration Invite
You can send a collaboration invite to a user from the project detail page.
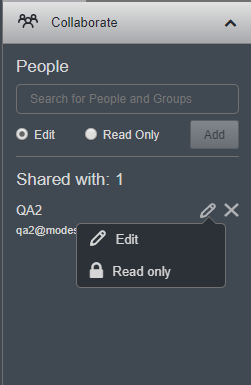
- Click the actions tab in the right side panel
- Expand the Collaborate Section
- Type the username of the user you want to collaborate with. They will need to be in a shared workspace with you.
- Select their collaboration permissions. "Read Only" or "Edit" (see below for more details)
- Click Add
The user will now see the project in the server project list.
Collaborate Permissions
Permissions allow/restrict a users access to certain functions of a project. There are two different permissions that can be set when sharing a project with another user. Permissions can be set either when selecting users, or can be changed at any time for users the project has already been shared with by changing the permissions icon.
Edit: Gives the user the ability to edit project details such as add or delete assets, as well as edit, play, create, or delete lessons.
Read Only: Restricts the users access to the project, only allowing them the ability to view the project details and play lessons available in the project.
Admin Users will automatically be given Edit permissions, even if the Read Only permission is explicitly set.
Syncing a Change
Once you have a project linked to an online version, you have the ability to sync the project. Syncing allows users to upload any changes they have made to the project on their local branch with the online version. If there are multiple users working on the same project, this allows collaboration, where each user can gain access to changes made by the other users.
What Does Syncing a Project Do?
Syncing a project does two things:
Download latest changes: The first step of syncing a project is to update your local project with changes made to the online version. Assuming this is successful, your project is updated with any changes made to the online project by other users.
Upload your changes: The second step of syncing is to upload your local changes to the online version of the project. This will allow other users to download your changes and have them applied to their local project versions.
How to Sync a Project
Syncing a project to its server version can be accomplished fairly simply. After changes have been made to the local (downloaded) version of the project the changes will be detected and you will see the sync button enable in the top right of the project detail page.
Complications When Syncing a Project
Occasionally when syncing projects, a merge conflict will occur. A merge conflict is when the same file or group of files has been modified by multiple users. The Portal will try its best to resolve merge conflicts without your help, but this will often require user input. For help resolving merge conflicts see here.