Localization
You can localize your content for multiple languages within the same lesson file. Translations can be done within the creator or uploaded by CSV files. Asset localization must be done within the creator only.
Step 1. Add a Language in Xplorer Creator
Adding a language to your lesson defines what languages will be available to the users when downloading the project in the Xplorer Player. It does not add any translations, by default all added languages will be in the default language the lesson was originally created in. You must follow step 2 to add the translations.
NOTE: Before adding other languages you should have the lesson fully completed in the default language first.
With your lesson complete:
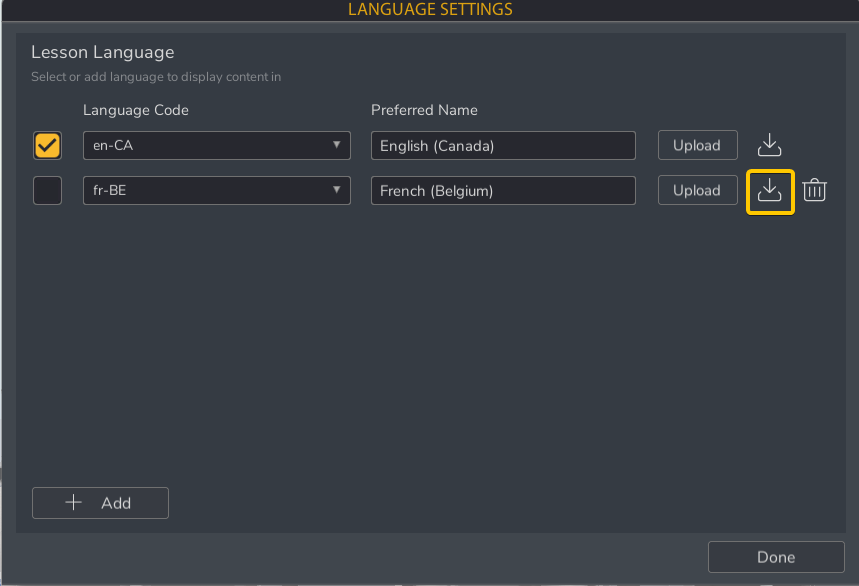
- Go to Lesson Ribbon -> Language -> Settings button
- In the language popup click "+ Add"
- change the language code via the dropdown
NOTE: the first language displayed in the list is the "default" language and will appear in all CSV's for translation.
Step 2. Translate Content with CSV
The most efficient way to translate the lesson text is through the CSV (comma separated value) file. These can be downloaded, translated by using any spreadsheet software such as Microsoft Excel or Google Sheets, and reuploaded to the lesson for each language.
1. Download the CSV
- Open the Lesson Ribbon -> Language -> Settings popup
- Click the "Download" icon next to the language you want to add a translation for
- Save the CSV file and name it something specific to the lesson and language as you will have a separate CSV table for each lesson and language pairing
2. Edit the CSV
With a language CSV file saved:
- Send the language CSVs to the translator
- Translator will open the CSV file in a CSV editing software such as Microsoft Excel or Google Sheets.
- There will be three columns in the localization table.
- Key: This is the localization ID that is attached to each text field in the creator. It can be edited within the creator and identified by clicking on the globe icon next to each text input field. In most cases you do not need to touch this field. It is what links the text values to the proper text field within the lesson. Do not edit these unless you wish to link fields together.
- Default Language: The second column will display the language code of the default language and contain all the values for each text input. These are the values that need translation.
- Translated Language: The third column will display the language code of the language you are translating for. Here the translator needs to enter the translations for the corresponding default values.
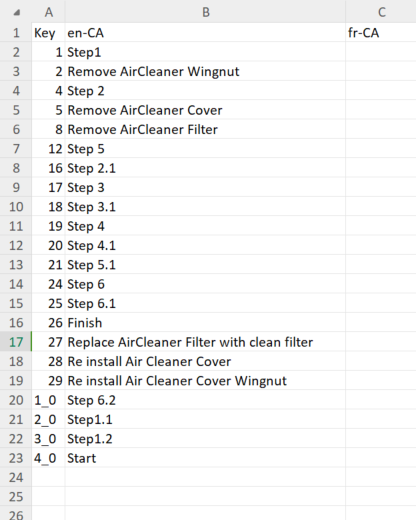
NOTE: If you leave any cells blank for the translated language it will fallback to using the default value.
3. Upload the CSV
Once all the translations are filled out for the translation language it's time to upload the CSV file back into the lesson.
- Overwrite the old CSV file in your project with the new CSV that contains all the translations you can do this from the windows file explorer or through Modest Tree Portal
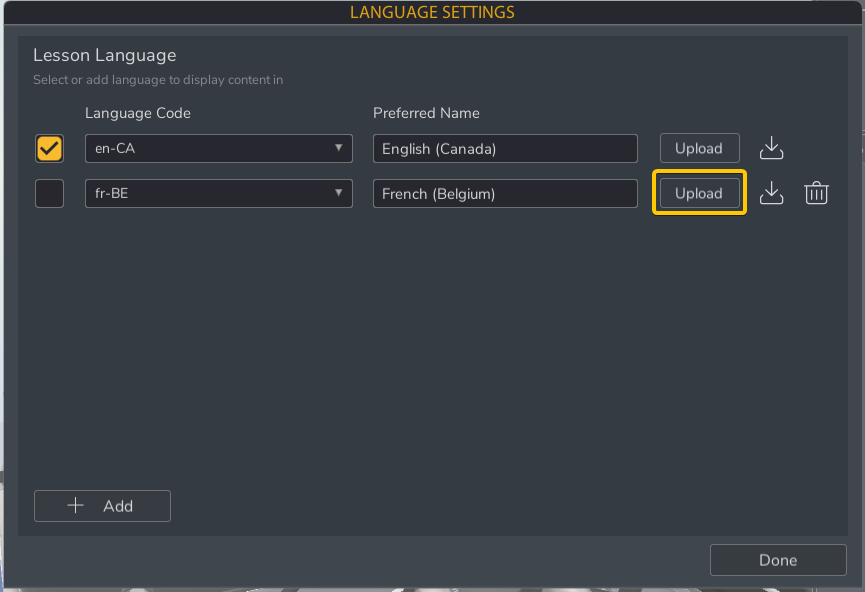
- In the Xplorer Creator -> Lesson Ribbon -> Language -> Settings popup
- Click the "Upload" button and select the new CSV file
Step 4. Preview and Edit Languages within creator
After the CSV file is uploaded in the language settings you can preview the lesson in that language by:
- Change the language in the Lesson Ribbon -> Language -> Language dropdown to the newly translated language
- Once the dropdown language is changed all values will switch to the translated language values in the creator
- Clicking "Play Preview" will show you how the lesson will look to the viewer when played in that language
- Any values that you edit in the creator while this language is selected will only update for this language
NOTE: If you create new hit points/text in a translated language all other languages will not have a default value filled out until it is defined in the default language. So make sure to only edit existing text values you want changed only for this language. Switch back to the default language if you need to change something for all languages.
Step 5. Add Translated Assets within Creator
Just like text the assets used (images, video, audio) can all be localized too. Assets can only be localized through the creator and not through the CSV at this time. To add a translated asset to your lesson follow these steps:
- Change the editing language to the language you want to add the translated assets for (This is done from the language dropdown in the Lesson Ribbon)
- Click on the object in the viewport that contains the asset reference
- In the properties replace the default asset reference with the translated asset by dragging and dropping or clicking the input and selecting the translated video
Repeat this for all assets that need updating. When you preview this language you should see the translated assets play instead of the default ones.